
Salesforce Configuration
Step 1: Create Authentication Provider
Go to Setup | Security Controls | Auth. Providers
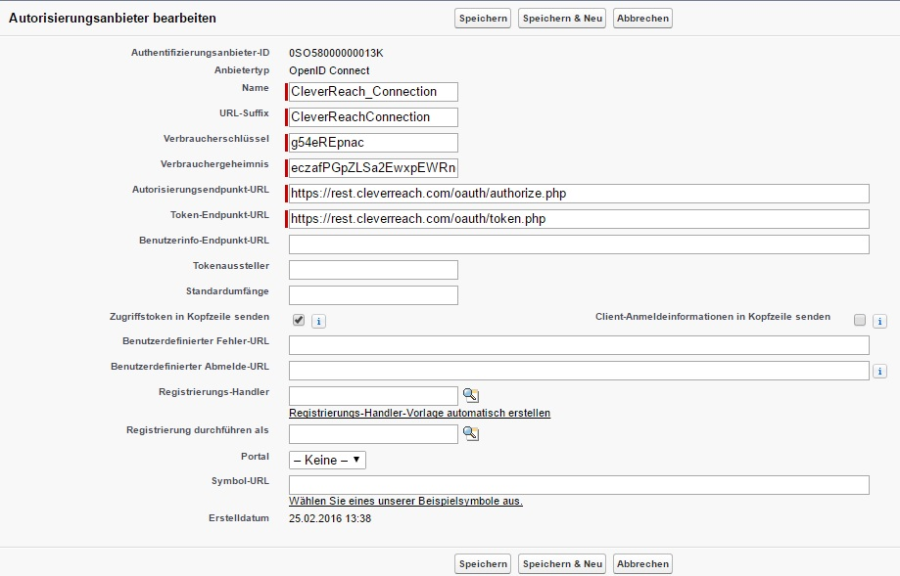
Create New Auth. Provider with following settings:
Provider type: OpenID Connect
Name: any
URL suffix: any
Consumer key: Client ID from the OAuth app (CleverReach Configuration, Step 3)
Consumer secret: Client Secret from the OAuth app
Authorization endpoint URL: https://rest.cleverreach.com/oauth/authorize.php
Token endpoint URL: https://rest.cleverreach.com/oauth/token.php
Send access token to in header: check
Other Fields: empty/not needed
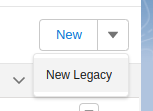
Step 2: Create Named Credentials (Legacy)
Go to Setup | Security | Named Credentials
Select New Legacy from the dropdown on the right side:
Create New Named Credential with following settings:
Label: CleverReach (or any other)
Name: CleverReach (or any other)
URL: https://rest.cleverreach.com/v3
Identity type: Per User
Authentification protocol: OAuth 2.0
Authentication provider: choose Auth. Provider (Step 1)
Scope: empty
Start Authentication Flow on Save: check
Generate Authorisation Header: check
Other Fields: empty/not needed

Save and connect on the new page to your CleverReach Account.
Step 3: Create Authentication Settings for External Systems
Caution: This step is required for each user to whom you give access to the app and limited to the amount of licenses you have. This is because every user who wants to use this app must be authenticated with user name and password at CleverReach. Otherwise the data transfer is not possible.
Go to Your User | My Settings | Personal | Authentication Settings for External Systems
or Setup | Manage Users | Users | user name | Authentication Settings for External SystemsCreate New Authentication Settings for External Systems with following settings:
External System Definition: Named Credential
Named Credential: from Step 2
User: Marketing User or System Administrator
Authentication Protocol: OAuth 2.0
Authentication Provider: from Step 1
Scope: empty
Start Authentication Flow on Save: check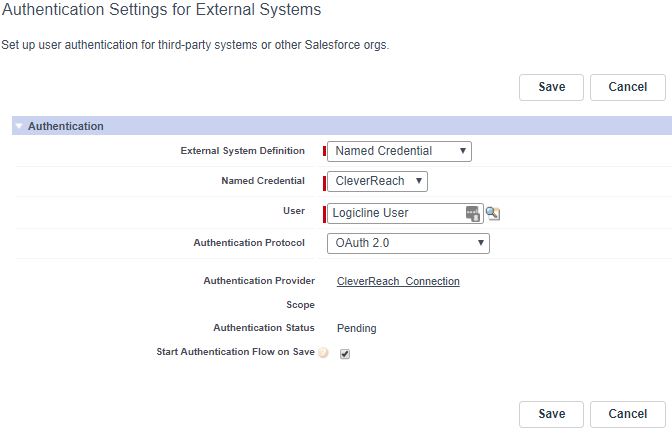
Save and login to your CleverReach Account on the next page.
The message "The authentication provider didn't provide a refresh token. If the access token expires, your org won't be able to access this named credential." can be ignored.
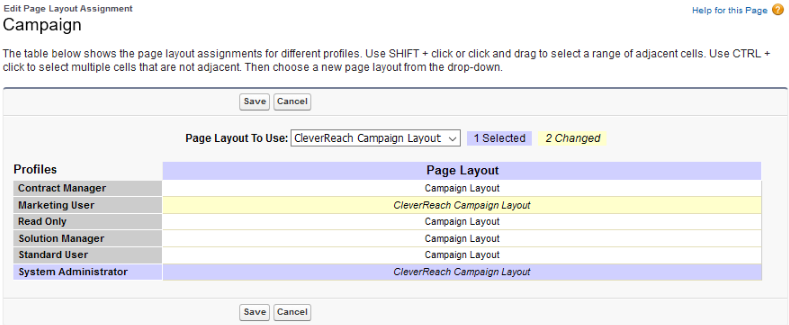
Step 4: Configure Salesforce Layouts
For the use of CleverReach for Salesforce, 2 page layouts must be replaced. The new layouts are included in the package. The campaign layout and campaign member layout must be replaced.
Go to Setup | Object Manager | Campaigns | Page Layouts . A table with all the configurable objects opens.
Click on Page Layout Assignment, now you'll see the Page Layout Assignment for the different profiles.
Click on Edit Assignment, assign the CleverReach Campaign Layout to the Marketing User and System Administrator and save it.
Go back to the Object Manager, select Campaign Members and click there on Page Layouts
Click on Page Layout Assignment assign the CleverReach Campaign Member Page Layout to the Marketing User and System Administrator and save it.
Furthermore you need to add to the Leads and Contacts Page Layouts some buttonsGo to Setup | Object Manager | Leads | Page Layouts | Edit | Buttons and drag the Update Email in CleverReach Button to the Custom Buttons in Lead Detail. For Lightning Experience you need to drag the button from Mobile & Lightning Actions to Salesforce Mobile and Lightning Experience Actions.
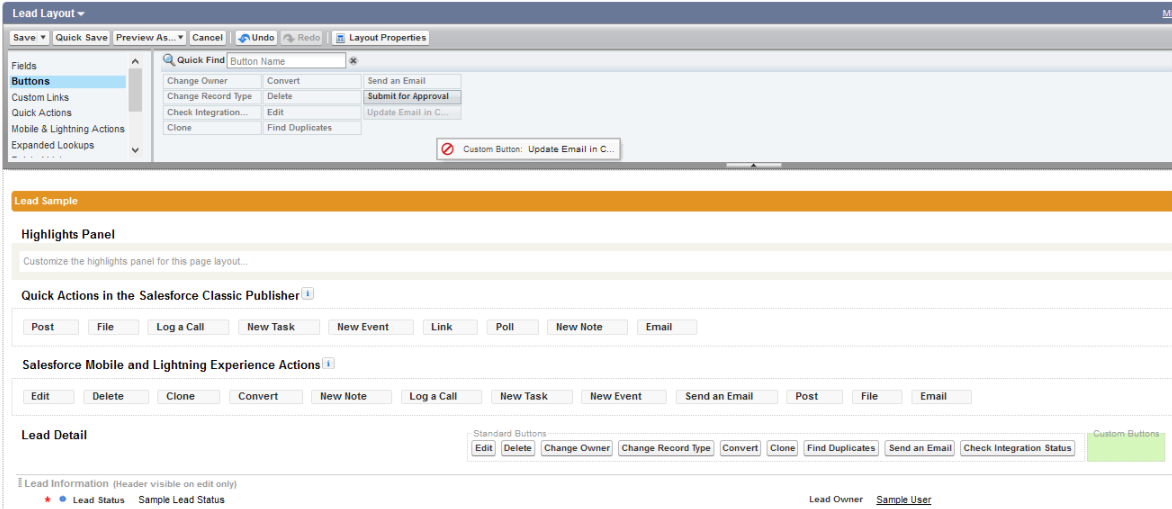
Repeat Point 6. for Contacts
For an easy list import from CleverReach you need to add the Import CleverReach List Button to the Campaign Searchlayout
Setup | Object Manager | Campaign | Searchlayouts
edit both Search Results and Campaigns List View and add Import CleverReach List button at Custom Buttons.
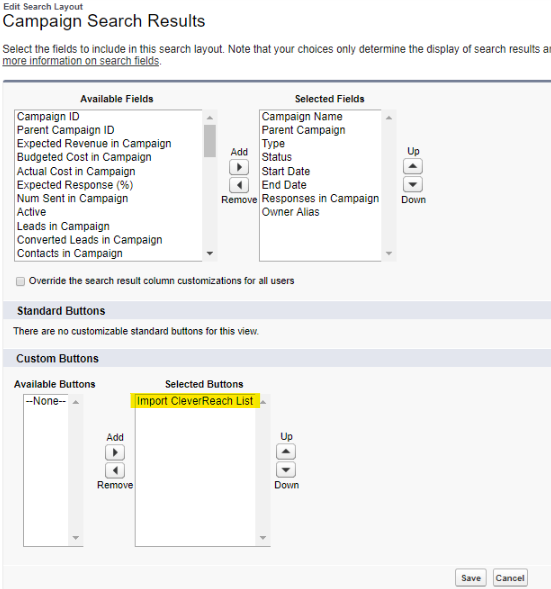
You can now see e.g. in the Campaigns Tab after clicking on GO! the new button to import a list.
Step 5: Assign Permission Set in Saleforce
For all user who do not have a system administrator profile, we have to grant so-called permission sets, to have the right you need to use. Note that users do not have access to the CleverReach account tab. This can only be edited by system administrators.
Select Setup | Users | Permission Sets
Select CleverReach Permission Set* and click on Manage assignments.
Select add assignments and select the users, which you want to access the app.
*If no permission set is available or it should work only to a limited extent, please contact us. You can also configure your permission set yourself.
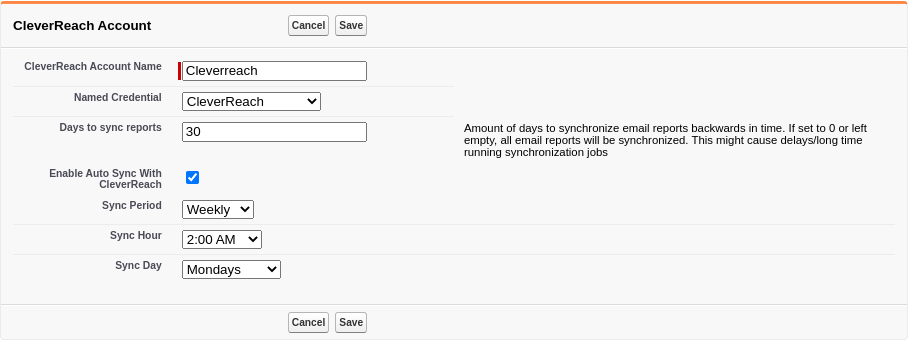
Step 6: Create CleverReach Account in Salesforce
Caution: A "CleverReach Account" does not correspond to the "CleverReach User". You must enter your log in data (the user), but you link your entire CleverReach account, not just a single user. This means that you can only create one CleverReach account per account, which you use. Otherwise your black lists and your global attributes are no longer global. Here are the instructions for the configuration:
Select CleverReach accounts tab
Create a new account with the following data:
CleverReach Account Name: Name of the CleverReach account
Name Credential: Name from the log in credential with name
Days to sync reports: Amount of days to synchronize email reports backwards in time. If set to 0 or left empty, all email reports will be synchronized. This might cause delays/long time running synchronization jobs
Enable Auto Sync: this is your decision
If you have selected the automatic synchronization, you can now select select the synchronization period. You can choose between Hourly, Daily or Weekly. If you choose daily, you still have to set the time. If you choose weekly, you must also set the day of the week.
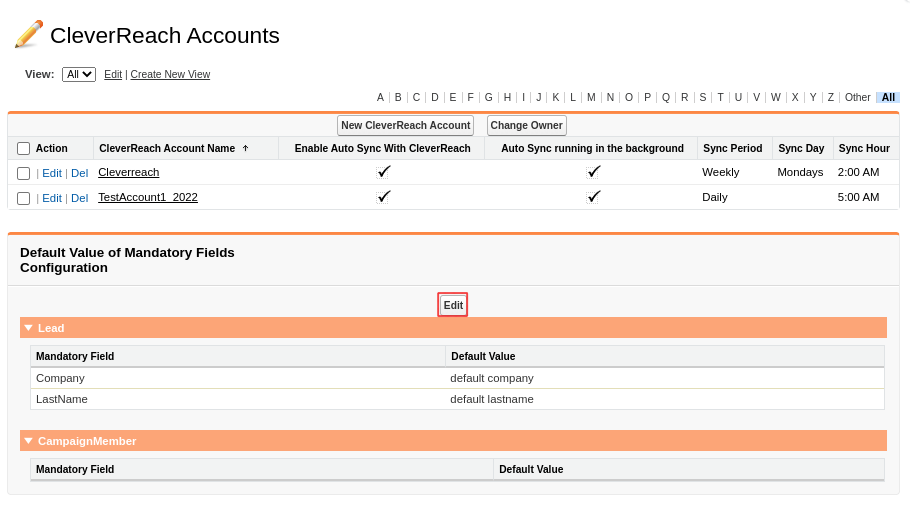
Step 7: Configure Default Values for Mandatory Fields
In Salesforce, the Lead object usually has mandatory fields, that can not be empty when you create leads. If you also want to create leads in Salesforce via CleverReach, these fields must be filled. If CleverReach does not send any content for these fields, you must maintain the default value for this case.
Go to CleverReach Accounts Tab. Here you will find the section Default Value of Mandatory Fields Configuration. Here you see the mandatory fields, which must be filled to create leads.
Click Edit. You can now define a value that is always used in the required fields when the CleverReach app generates a lead in Salesforce and no content is delivered via CleverReach. If you do not create your own fields in Salesforce, you will only find the entries LastName and Company. You can find out how to create required fields themselves, in the Salesforce Manual.
Step 8: Known Issues and Solutions
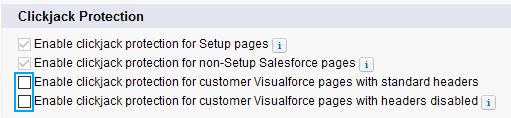
Clickjack Protection
For Classic currently an error message is shown if Clickjack protection is active when a page with added visualforce page in the page layout is shown.
Clickjack protection must be deactivated therefor (default configuration) Setup | Security Controls | Session Settings | Clickjack Protection:
Error Description: Page seems to load correctly, then an error message is shown: URL No Longer Exists. ...
Third-Party Cookies
Lightning won't work correctly if third-party cookies are not allowed in your browser.
Classic should work in most cases even if not allowed.
One effect would be, that some pages show white content on a salesforce page.
Authentication
From time to time the authentication becomes invalid. An error message will be displayed, stating:
An error occured. Please check your named credentials.
Or similar.
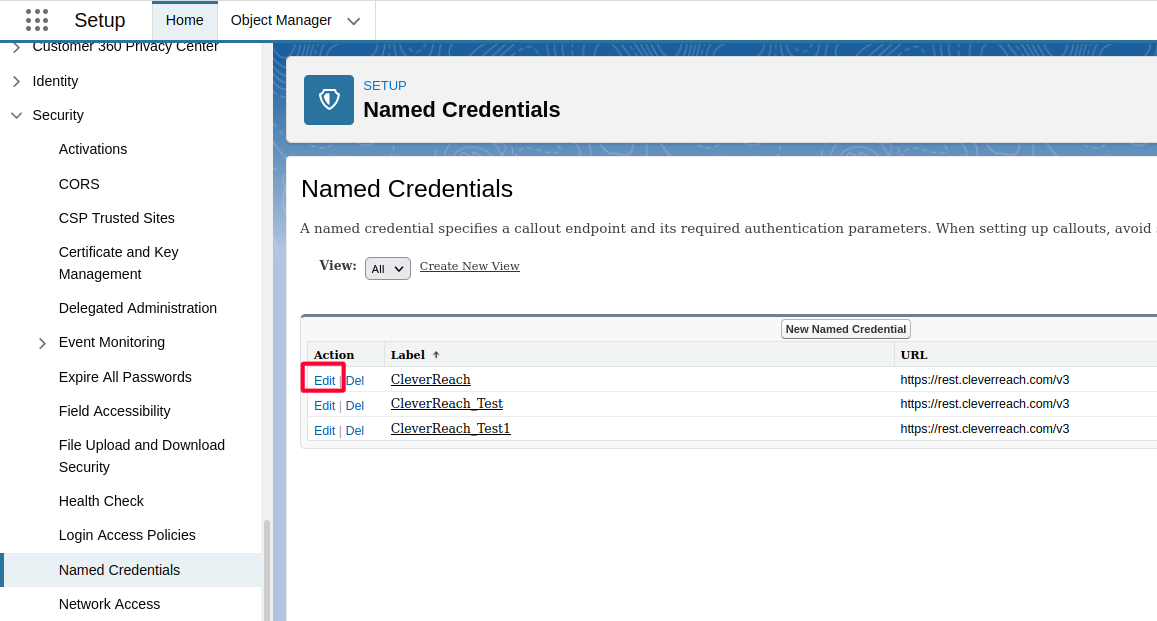
In this case, the authentication has to be renewed. To do this, the named credentials are edited: Setup | Settings | Security | Named Credentials (alternatively enter "named credentials" in the Quick Search). There you'll find the named credentials created in Step 2.
For the named credentials, click Edit. In the subsequent dialog, make sure that the check mark next to Start Authentication Flow on Save is set.
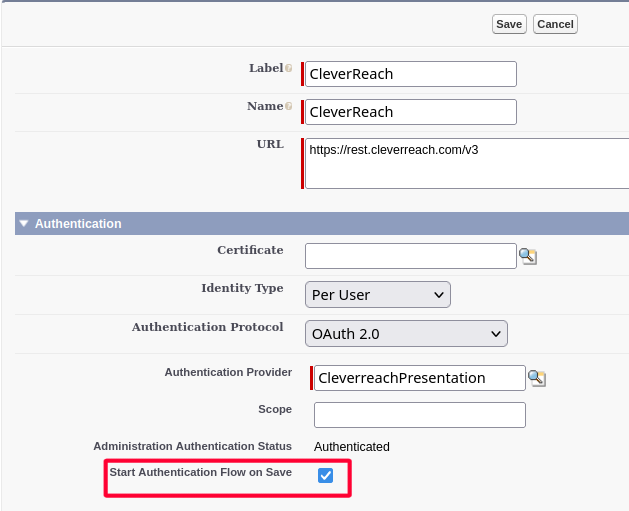
Select Save and log into CleverReach on the next screen. If the authentication is successful, you will be redirected to Salesforce.
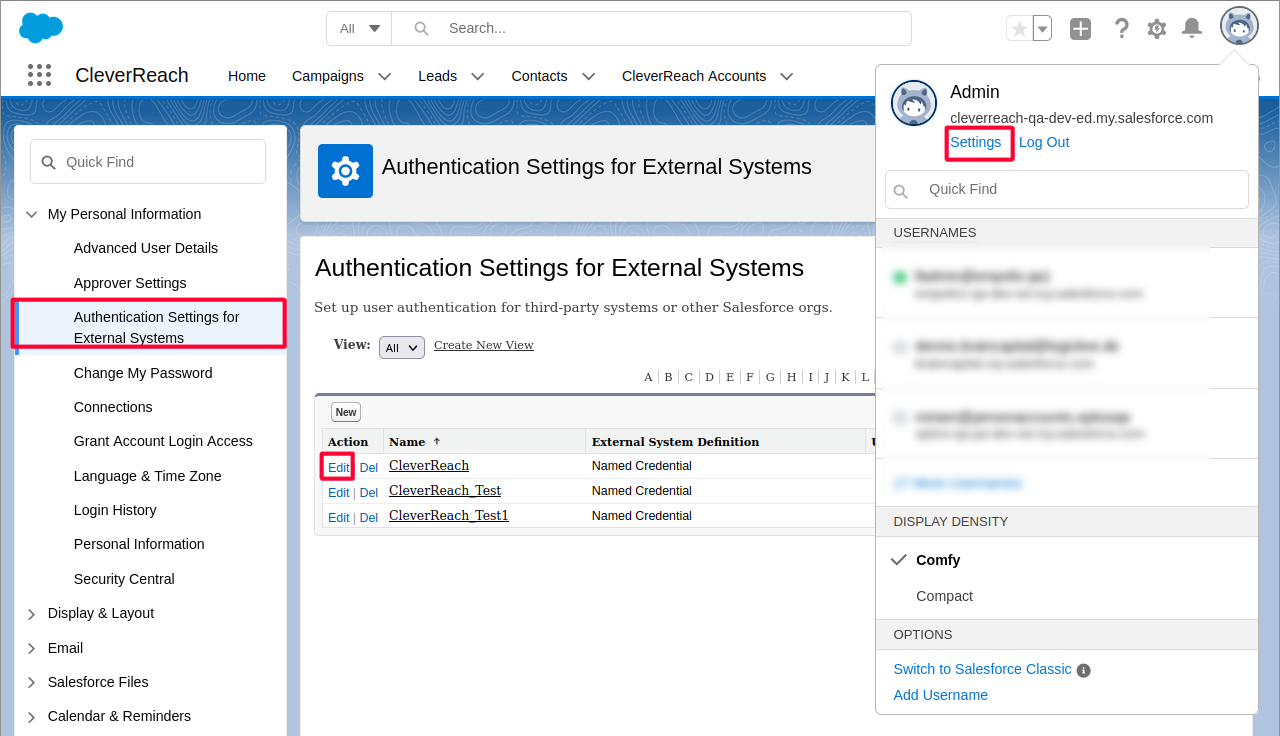
Below the details of the named credential you will see a list of the users who are authenticated for CleverReach. Select Edit for each user one at a time and repeat the above steps:

Alternatively, each user can authenticate himself. To do this, open your Settings | Authentication Settings for External Systems. Click on Edit next to the named credential.
Make sure here also that the check mark next to Start Authentication Flow on Save is set. Select Save and log into CleverReach on the next screen. If the authentication is successful, you will be redirected to Salesforce.